So you want to rock 1920s long hairstyles or flapper looks for a wedding, holiday party, or birthday? Whether you have straight, curly, or wavy hair, you’ll be happy to know it’s never been easier and faster to recreate these vintage hairstyles with modern tools and technology. With curling irons, flat irons, and all the new hair products out there, you can create teased vintage waves, finger waves, and more in no time. Get your glamour on and bring the 1920s into the 21st century!
Flapper Styles for Long Hair: Vintage Looks for Your Next Themed Event
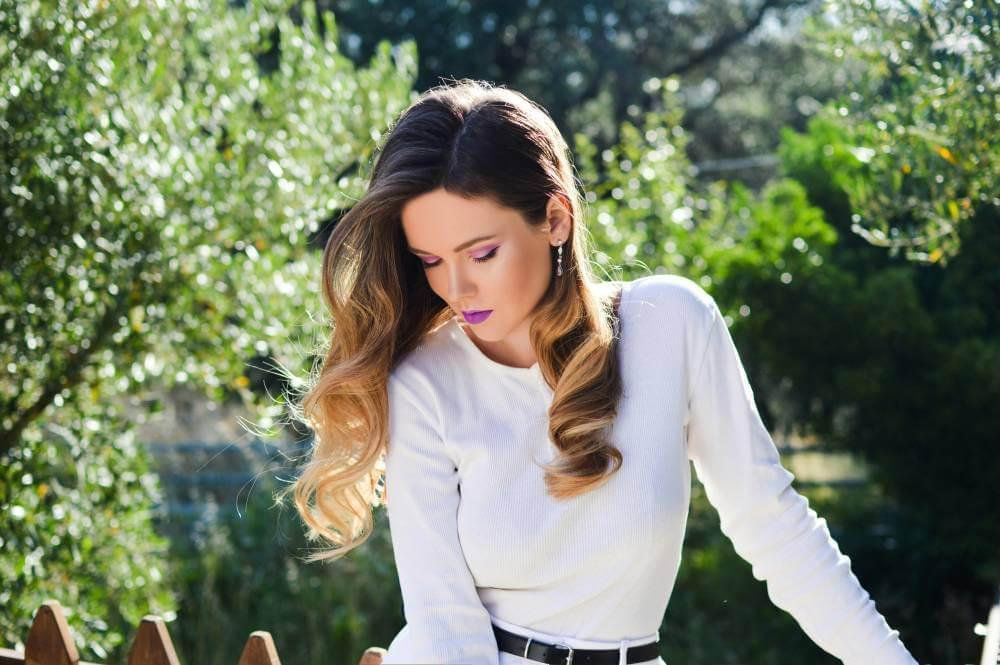
1. Fringe Flapper 1920s Long Hair Hairstyle
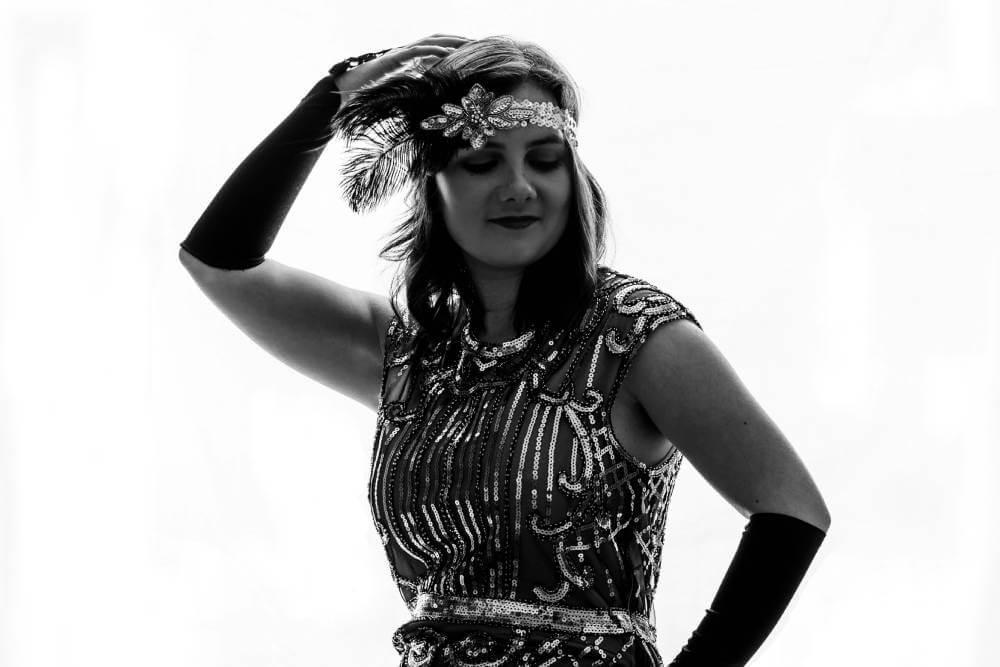
Want to add some vintage to your next themed event? Try clip-on bangs for the night. These temporary bangs let you try out different looks without committing to a haircut. You can go for the classic Bettie Bangs of the 50s or a modern side-swept style.
To recreate the fringe flapper look, start with clean, dry hair. If using clip-on bangs, secure them in place so they blend with your natural hair. For a sleek look, flat iron the rest of your hair to create a smooth base. You can wear your hair down for an elegant look or gather it into soft waves for a playful vibe.
The key to this hairstyle is to add a sparkly hair accessory to take it to the next level. A headband with rhinestones or pearls will instantly add glamour and make you feel like you’re from the 1920s. Or a jeweled clip or a feathered fascinator will add vintage and show off your personality.
To complete the look, consider your makeup and outfit, too. A classic red lip and smoky eyes will go perfectly with your flapper hairstyle. A fringed dress or beaded gown will tie the whole look together. Don’t forget to pay attention to your nails, too; a manicure will complete the look.
This style is perfect for themed events like Gatsby parties, wedding receptions, or costume parties. With the right accessories and attention to detail, you’ll be able to get your glamour on and show off your personality! Plus, this style is versatile, so you can go from day to night, making it perfect for any occasion.
2. Glamorous 1920s Finger Waves
For a head-turning look that’s pure 1920s elegance, go for neat and defined finger waves. This classic style is glamorous, sophisticated, and vintage. Finger waves will elevate your whole look, making them perfect for themed parties, weddings, or any event where you want to shine.
To do these finger waves, start with clean, damp hair. Apply a generous amount of Emerge Style Goals Gel so your waves have plenty of definition and hold. This gel is perfect for the sleek-looking finger waves you require.
Once you’ve applied the gel, use a wide-tooth comb to part your hair to one side. Section your hair into manageable parts—about 1-2 inches wide, depending on how thick your hair is. Use a small curling iron or wand to curl the hair away from your face. Hold each curl for a few seconds before releasing it, and let it cool in place.
Once you’ve curled the sections, it’s time to shape your finger waves. Take a small section of hair at the front and pinch it between your fingers to create a wave, then secure it with a bobby pin at the base. Continue this throughout your hair, alternating the direction of each wave for a more dramatic look. For a true 1920s feel, go for deep, defined waves like the styles of the era.
Once you’ve pinned all the waves, let your hair set for a few minutes. Then, gently remove the bobby pins, and be careful not to disturb the shape of the waves. Finish off your finger waves with a light mist of hairspray to set them in place for the day or night.
Finish off your flapper look with a classic red lip and a fabulous dress. Whether it’s a sparkly dress or a beaded fringe number, your finger waves will sit perfectly on top of it all, and you’ll be the belle of the ball.
3. Teased Finger Waves
Tease your flapper hairstyle with teased finger waves for a big and dramatic look. This combo is pure 1920s glamour but with a modern twist, perfect for any themed event or special occasion. The teased ends give your finger waves volume and drama, so you can really make an entrance.
To achieve this look, start by spraying heat protectant spray on your hair to protect it from styling damage. Then, create soft finger waves with a curling or flat iron, focusing on the mid-lengths to the ends of your hair. Remember to mold the hair into an ‘S’ shape with your fingers and pin each wave in place as you go for that vintage look.
Once your finger waves are set, it’s time to add some drama with teased ends. Take a small section of hair at the bottom and gently backcomb it with a fine-tooth comb. This will add volume and texture to your waves and make them more dynamic. For long-lasting hold and to keep your teasing in place, spritz the teased sections with Bed Head by TIGI Maxxed Out Massive Hold Hair Spray. This hairspray gives you the hold you need without being stiff or crunchy.
After teasing, smooth the top layer of hair over the teased sections to create a sleek finish. This will hide the teasing while keeping the volume you want. Finish off with a light mist of hairspray to set everything in place without losing the softness of the waves.
To complete your flapper hairstyle, accessorize with a statement headband or vintage-inspired hairpin that matches your outfit. Look for pieces with sequins, pearls, or feathers to really get into the spirit of the Roaring Twenties.
Teased finger waves are the ultimate combination of classic and modern. Whether you’re attending a Gatsby party or just want to feel like a vintage goddess, this hairstyle will make you feel fabulous and confident. Go out and show off your gorgeous look and turn heads wherever you go!
4. Middle Part Finger Waves
For a modern take on the classic finger wave hairstyle, try the middle part finger waves. This sleek version is all about symmetry and adds a bit of polish to your overall look, which is perfect for formal or casual occasions.
To do this style, wash your hair with a smooth shampoo and conditioner to create a sleek base. After towel drying, apply a styling mousse or setting lotion to your hair to add hold and texture. This will give your waves longevity and keep them looking sleek all day.
Next, use a fine-tooth comb to create a clean middle part. Make sure the part is straight and even.
Use a curling or flat iron to create finger waves. Take small sections of hair and curl away from your face, then immediately use your fingers to shape them into an ‘S’ shape. Pin each wave in place with a bobby pin as you go to help set it as you work on the rest of your hair. Do this on both sides so that the waves mirror each other for a balanced look.
Once all your waves are styled and pinned, leave them to cool for a few minutes. This will set the shape of the waves and give you a more defined look. After cooling, remove the bobby pins and run your fingers through the waves to soften the look if you want.
Finish off the middle-part finger waves with a light mist of hairspray to set them in place without stiffening them. If you want to add some shine, use a shine serum to give your hair a healthy, glossy finish.
This style is super versatile. You can dress it up with vintage-inspired accessories like a jeweled headband or a floral clip or keep it simple for a more low-key look. The middle part finger wave is timeless elegance that pays homage to past styles but is modern, too.
5. Flapper Hair Accessory for Long Hair
Are you unsure how to style your long hair for a flapper-themed event? You’re in luck! There are flapper hairstyles for long hair that can be done in 5 minutes or less. One of the easiest ways to elevate your appearance is with a flapper accessory.
For a quick and easy updo, gather your hair into a loose bun or chignon at the nape of your neck. Twist and pin your hair in place, and let a few tendrils fall around your face for a romantic touch. Once your hair is secured, add a flapper headband or hairpiece. Look for accessories with sequins, feathers, or beads to get the Roaring Twenties vibe. A sparkly headband can turn a simple updo into a showstopper.
Suppose you want to wear your hair long, leave it natural, and style it with soft waves or curls. Use a curling or flat iron to create loose waves, and then run your fingers through them for a relaxed look. You can also add a decorative hair clip or barrette on one side to draw attention and add some flair.
Another quick and easy option is to braid a section of your hair and secure it with a flapper hairpin. This will give your style a little something extra while still keeping it elegant.
6. Beret Accessory
Add a beret to your outfit to get a classic flapper look that goes with long hair. This chic and timeless piece is inspired by the Roaring Twenties but is modern. Berets are versatile and can be worn with many hairstyles to enhance your flapper look.
When choosing a beret, opt for one with pearls, flowers, sequins, or rhinestones. These embellishments add glamour and make the beret perfect for themed events or special occasions. Neutral colors like black, beige, or soft pastels work well, so the beret won’t overpower your look.
To wear a beret with long hair, curl it into soft waves or finger waves for a vintage look. You can also wear it loose, flowing, or up in a bun for a more relaxed look.
Once your hair is styled, place the beret slightly tilted on your head. Put it over one ear to get that flapper look. If you want to add some extra flair, pin a decorative hairpin or brooch to the side of the beret to make it look cohesive and polished.
To complete the flapper look, wear the beret with a glamorous dress or a vintage-inspired outfit. Add long pearl necklaces, feather earrings, and a clutch to really get the 1920s vibe.
7. Floral Accessory
Add a floral accessory to your hairstyle to complement the elegant finger wave. Floral accents add romance and sophistication and are great for special occasions, weddings, or any event where you want to look vintage.
To add a floral accessory to your finger wave hairstyle, start by curling your hair into soft finger waves. Once your hair is styled into finger waves, you can wear it down or gather it into an elegant updo.
Once your waves are set, it’s time to choose the right floral accessory. Consider a delicate flower crown, a single statement bloom, or a cluster of smaller flowers. Choose flowers in soft, muted colors like blush pinks, whites, or pastel shades that will match your overall look or vibrant flowers to make a statement.
Position the floral accessory to enhance your hairstyle. If you’re wearing your hair down, place the flowers on one side of your head so they cascade down your waves. If you’re wearing your hair up, tuck the floral piece into the bun or chignon and secure it with bobby pins so it won’t budge throughout the event.
For extra texture and dimension, mix in different flowers and greenery. Adding eucalyptus or delicate leaves will give the vintage elegance of the finger waves a more bohemian feel.
The floral accessory not only enhances your hairstyle but also ties your whole look together. Wear it with a vintage-inspired dress or a modern flapper-inspired outfit, and you’ll be turning heads.
8. Victory Roll Space Buns
For a fun and playful take on a classic hairstyle, try combining victory rolls with space buns. This combo is a 1940s classic with a modern twist that is perfect for themed events or everyday wear.
To do this style, start by sectioning your hair into two equal parts. Begin with one side: Take a small section of hair from your hairline and create a victory roll. Roll the section back towards your scalp and secure it with bobby pins. This vintage roll will add height and volume. Repeat on the other side of your head.
Now, gather the rest of your hair into two high ponytails, one above each victory roll. Twist and wrap the ponytails into space buns and secure with hair ties and bobby pins as needed. Go for a bit messy and undone to keep the look fun and on-trend.
To take your hairstyle to the next level, add a headband or hair accessory. Look for ones with sequins, feathers, or floral details to match the playful vibe of the victory roll space buns. A colored headband will also draw attention to your face and tie the whole look together.
9. Voluminous Finger Waves
Go for the elegance of the 1920s with a voluminous finger wave hairstyle perfect for long hair. This is a classic style of the flapper era but still a chic option for modern events. Finger waves add texture and a wave pattern that’s sophisticated and glamorous, perfect for special occasions or themed parties.
To create voluminous finger waves, start by spraying your hair with a heat protectant. Use a curling or flat iron to create soft waves all over your hair, focusing on the mid-lengths to ends. Once your waves are set, use a wide-tooth comb or your fingers to gently tease the curls to make your hair look fuller.
Now, take a small section of hair at the front and create a finger wave. To do this, use your fingers to shape the hair into an ‘S’ shape and press the waves down against your scalp. Pin each wave in place with bobby pins as you work on the rest of your hair. Repeat on the other side so the waves are mirrored for a sleek finish.
For extra volume, tease the roots of your hair before you create the finger waves. This will lift the waves and have a dramatic effect on overall appearance. Once you have the shape you want, finish with a light-hold hairspray to keep the waves in place without weighing them down.
Accessories your voluminous finger waves with a glamorous headband or hairpin with pearls or rhinestones to add to the vintage vibe. This style is versatile enough to be worn with a flapper dress or a modern gown, so you can be a Roaring Twenties flapper while still being you.
10. Pin Curl Updo
The pin curl updo is a great option for a sophisticated yet easy style for formal occasions. If you don’t want to wear a full head of pin curls, you can still create a chic look by doing one or two pin curls. This updo is elegant and vintage but practical and easy to do.
To start, gather your hair in a low ponytail at the back of your neck. Secure with a hair tie, leaving a few sections of hair loose to create the pin curls. Depending on your preference, you can curl the front sections of your hair or leave some strands loose around your face for a softer look.
Wrap one of the loose sections around your finger to create a loop. Use a bobby pin to pin the curl to your scalp, ensuring it’s secure and in place. Repeat with any other sections you want to curl. You can vary the size of the curls for extra texture and interest or keep them all the same for a sleek finish.
Once your pin curls are in place, gather the rest of your hair from the ponytail and twist it into a loose bun. For a more dramatic look, position the bun at the back of your neck or higher up. Use bobby pins to secure the bun in place and tuck in any stray hairs to look neat.
For extra glamour, add a hairpiece or decorative comb to your pin-curl updo. Look for accessories with pearls, crystals, or vintage-inspired designs that match your outfit and overall look.
This style is great for formal occasions like weddings, galas, and cocktail parties. You can wear it with elegant dresses or vintage-inspired clothes, so it’s a great option for any stylish event.
11. Elegant Flapper Updo
The elegant flapper updo is a great option for a glamorous 1920s-inspired look. This style has beautifully done finger waves and a floral hair accessory, so it’s perfect for weddings, themed parties, or any formal occasion.
To do this updo, start with The Good Stuff Frizz Control Oil. This will help tame the frizz and keep your hair smooth throughout the styling process. Apply a small amount to damp hair, focusing on the mid-lengths and ends, and then blow dry or air dry.
Once your hair is dry and frizz-free, divide it into sections for easier styling. Start with the front sections of your hair and create classic finger waves. Use a curling iron to curl small sections of hair away from your face, then shape the curls into the ‘S’ wave pattern with your fingers. Pin each wave in place as you go through the rest of your hair.
Once you’ve done the finger waves, gather the rest of your hair to the back and twist it into a low bun or chignon. Make sure the bun is neat and secure, using extra bobby pins if needed. You can go for a sleek, tight bun or a looser, more textured look.
To finish your elegant flapper updo, add a beautiful floral hair accessory. Look for pieces with delicate flowers, pearls, or crystals that match your outfit. Place the accessory above the bun or to the side to add glamour and charm to your hair.
This flapper updo is not only 1920s-inspired but also a versatile style that can be worn for any formal occasion. The finger waves and floral accent are a timeless look that will make you feel glamorous and sassy.
12. 1920s Long Hair Beehive Style
Get the glamour of the Roaring Twenties with a beehive style that’s vintage-inspired but modern. This style is glamorous and adds height and volume, so it’s perfect for any occasion, themed parties, or formal events.
To do this look, start with dry hair. If you have straight or sleek hair, you may want to add some texture for better grip. Use a curling iron or texturizing spray to add body to your hair. If you have textured or relaxed hair, this style works great with your natural texture. For a strong and long-lasting hold, apply TRESemmé Extra Hold Hair Gel all over your hair, focusing on the roots and mid-lengths for best results.
Then, secure your hair to the crown of your head into a high ponytail with a solid hair tie. Make sure the ponytail is tight so it’s the base of your beehive. Take sections of the ponytail and backcomb it gently to add volume. Start from the ends and work your way up to the roots. This will give you that beehive height and fullness. Once you have the desired volume, smooth the outer layer of the ponytail to get a sleek look. Backcomb the backcombed hair into a bun and pin it in place with bobby pins so it looks like a beehive – rounded at the top and tapered at the sides.
Use extra bobby pins to secure any stray hairs so your beehive feels secure but looks soft and undone. Smooth down any flyaways with a bit more hair gel or hairspray for a finished look. To complete your 1920s beehive style, add some vintage-inspired accessories. A pearl headband, floral clips, or decorative combs will add to the elegance and glamour of your hair. Finally, give your hair a light mist of hairspray to set everything in place so your beehive stays in place and looks great all night.
13. Faux Finger 1920s Long Flapper Hairstyle
If you’re short on time or not skilled in hair styling, don’t worry. With this easy updo, you can fake a finger wave style that looks like 1920s glamour. The key to this look is to create gorgeous curls in the front of your hair that will create a face-framing effect and channel the vintage charm of the flapper era.
Start with dry hair. If you have straight hair, add some texture with a curling wand or hot rollers. For this faux finger wave style, you want to focus on soft, defined curls at the front of your hair. Use a curling iron to take small sections of hair and wrap them away from your face. Hold each curl for a few seconds to set it. Once you’ve curled the front sections, let them cool, then gently release them to set the shape.
Then, gather the rest of your hair into a low ponytail or bun at the back of your neck. Secure with a hair tie, then twist the ponytail around to create a loose bun and leave some tendrils framing your face. For extra elegance, you can leave a few curls out at the sides to add to the flapper vibe.
To create the faux finger wave effect, take a small section of the curled hair at the front and pin it in place with bobby pins. Use your fingers to shape the curl into a wave and pin it to your scalp. Repeat this with more sections of hair until you have the desired finger wave look.
Once you’re happy with the shape and style, give everything a light mist of hairspray to set it in place. This will keep your faux finger waves in place all day or night, making them perfect for any themed event or special occasion.
14. 1920s Long Hair Gibson Tuck Style
If you want an alternative to the bun, the Gibson Tuck is a beautiful option that adds a touch of vintage glamour to your long hair. Popular in the early 1900s and carried into the 1920s, this style is sophisticated and easy to do. It is perfect for any formal occasion, themed events, or just elevating your everyday look.
To do the Gibson Tuck, start with dry hair. If you have straight hair, add some wave or texture for a more relaxed look. You can use a curling iron or hot rollers for this, but make sure the waves are soft and not too defined. If you have textured hair or natural waves, you can skip this step.
Begin by parting your hair down the middle or to one side depending on your preference. Then gather all your hair into a low ponytail at the back of your neck. Secure the ponytail with a hair tie make sure it’s snug but not too tight. This ponytail will be the base of your Gibson Tuck.
Then, take the ponytail and divide it into two equal sections. Twist each section loosely, then wrap them around the base of the ponytail to form a loose bun. Tuck the ends of your hair under the bun and pin as you go to create a smooth finish.
To get the Gibson Tuck look, use your fingers to gently pull at the sides of the bun and loosen it slightly to create a fuller look. This adds to the effortless vibe of Gibson Tuck. For extra elegance, you can decorate your style with a vintage-inspired hair accessory like a floral clip, jeweled comb, or decorated headband.
Finish with a light mist of hairspray to set everything in place for the day or night. The Gibson Tuck is a stylish and practical option that keeps hair off your neck and looks elegant.
15. Flirty Faux Bob
If you want to try something fun and flirty without cutting your hair, the faux bob is the way to go! This playful take on finger waves brings a fresh and young vibe to your look and lets you have the elegance of vintage styles. The faux bob is chic and versatile, so it’s perfect for everyday, casual, or more formal occasions.
To do your flirty faux bob, start with dry hair. If you want added texture, you can create soft waves with a curling iron or styling wand. Focus on curling the ends of your hair for a playful bounce that will add to the bob illusion. Once you have the wave you want, use your fingers to rough dry your hair to create a more relaxed look.
Then, gather your hair into a low ponytail at the back of your neck. Leave some front sections loose to frame your face, as this will add to the playfulness of the style. Secure the ponytail with a hair tie, but don’t pull it all the way through. Leave the last inch of hair in the tie to create a loop.
Now twist the rest of the hair in the ponytail into a bun, tucking the ends under and pining as you go to create the illusion of shorter hair while still having full hair. Adjust the bun as needed and pull out a few pieces to soften the look and give it that flirty vibe.
To add to the faux bob charm, you can also add finger waves to the front sections of your hair. Use a small curling iron to create soft, defined waves and pin them in place for a few minutes to set the shape. Once the waves have cooled, the pins are released, and the waves fall naturally.
Finish with a spritz of hairspray to set everything in place. For extra elegance, you can add a decorative hairpin, flower, or headband to match your outfit.
16. Party Curls
Get ready to turn heads and steal the show with Party Curls, the ultimate hairstyle for any party! These bouncy, flirty curls are fun and playful, perfect for a night out, a wedding, or a themed party. They look fabulous and bring a sense of celebration that’s hard to resist.
To create party curls, start with dry hair. Before styling, you can apply a volumizing mousse or spray for added volume and texture. This will give your curls a great base and make them last all night.
Use a curling iron or wand and wrap small sections of hair around the barrel, holding for a few seconds before releasing. For more defined curls, wrap your hair tightly; for looser beachy waves, leave the ends out slightly. Continue until all your hair is curled, and alternate the direction of the curls for a more natural look.
Once you have curled your hair, let it cool completely. This is key to your curls holding their shape and lasting through all the dancing and partying. After cooling, run your fingers through the curls to separate them and create a softer, fuller look. If you want a more defined curl, you can skip this step.
To add smoothness and stronghold to your party curls, mist them with TRESemmé Compressed Micro Mist Smooth Hold Level 2 Hair Spray. This lightweight hairspray will keep your curls in place without weighing them down or making them feel stiff. Hold the can 10-12 inches away from your hair and mist over your curls evenly.
For extra fun, add some sparkly hair accessories or decorative pins to your curls. Whether it’s a hairpin or a headband, these little extras will take your look to the next level.
With Party Curls, you’ll be ready to dance the night away and enjoy every moment of your special occasion. These playful curls celebrate your hair’s natural beauty and the fun of any party. So grab your friends, hit the dance floor, and let your curls sparkle!